(Jun 2024)
On this page I describe my experiences with transferring my Drupal site from D9 with the MAYO theme to D10 with the SOLO theme.
The upgrade from d9 to d10 is described in detail on another page. Here I am talking about the steps from MAYO to SOLO.
MAYO has not been maintained for years and with some tinkering still works for d9. However, it is not going to be reliable, so I looked for another theme that is in full development and with which I can create a lookalike of the site with MAYO. I ended up at SOLO, which is also D11 proof.
However, there is no D9 version of this, so we have to upgrade to d10 via another theme.
I assume the website is now running locally.
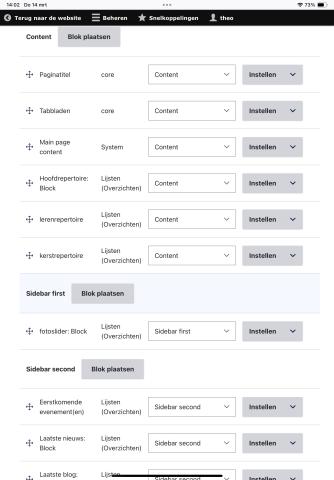
First of all, we need to take screenshots or notes of the block layout in mayo.
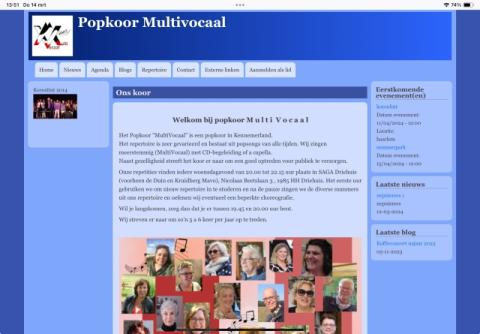
Also screenshots of the homepage and other important pages in terms of layout.
Finally, we need a screenshot of the color setting.
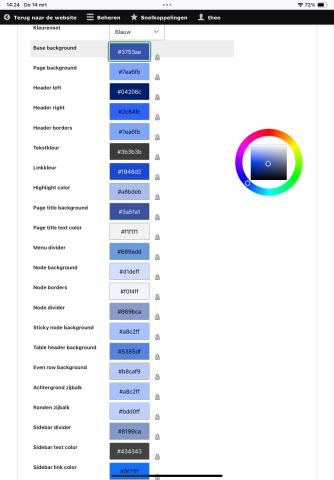
Once we have this information, we can set Olivero as the default theme. Your website now looks completely different in terms of layout, but that is not a problem for the upgrade. Now uninstall mayo. This is important otherwise you cannot physically remove the mayo folder.
The deprecated module color can now be uninstalled.
Now it's time to update and then upgrade the website. See the tab from d9 to d10. Here is how I did this.
If the upgrade is successful, the SOLO theme can be installed with composer.
SOLO is placed in themes/contrib/. To replace MAYO, I use a subtheme called SOLOMAYO, which is placed in themes/custom/. The custom folder probably does not exist yet and will therefore have to be created.The most recent version you’ll find on https://github.com/tzsl/solomayo.
You can also make a copy of the subtheme folder from the SOLO folder and place it in the custom folder. You will then have to change the names and references. If you don't do this, you will have a problem with theme updates.
These are the adjustments needed:
- rename in themes/custom the folder solo_subtheme in solomayo and go to this folder
- rename solo_subtheme.info.yml to solomayo.info.yml
- rename solo_subtheme.libraries.yml to solomayo.libraries.yml
- rename solo_subtheme.theme to solomayo.theme
- edit solomayo.info.yml
- name: Solomayo sub-theme
- description: Solomayo subtheme
- libraries: - solomayo/solomayo-global
- edit solomayo.libraries.yml
- 1 solomayo-global
- 5 css/solomayo-style.css
- 8 js/solomayo-script.js
- edit solomayo.theme
- 11 function solomayo_theme_suggestions_block_alter(&$suggestions, $variables) {
- 15 $suggestion = str_replace('solo_', 'solomayo_', $suggestion);
- rename config/install/solo_subtheme.settings.yml to solomayo.settings.yml
- rename css/solo-subtheme-style.css to solomayo-style.css
- rename js/solo-subtheme-script.js to solomayo-script.js
- adjust screenshot.png if necessary
Once the subtheme has been placed and adjusted or the zip file has been unzipped, go to management > appearance and install solomayo as default. SOLO is also automatically installed immediately.
Wait a little longer before you start putting things into the theme, but be the first to put the blocks in the right place. Because Solo is so extensive, it only shows the regions that contain blocks.
Now we can start setting up our solomayo theme. There are two methods to enter the colors:
- 1 via solomayo-style.css.
- 2 via the theme's settingsa
I start with 1 because the mayo look is built up in the CSS. During the construction I had to type in the color codes every time, but I now describe a different approach. In the css folder I created an extra folder “color”. I have created separate color CSS files that correspond to the colors that Mayo has available. For example, the file mayo-blue.css contains all mayo variables of blue.
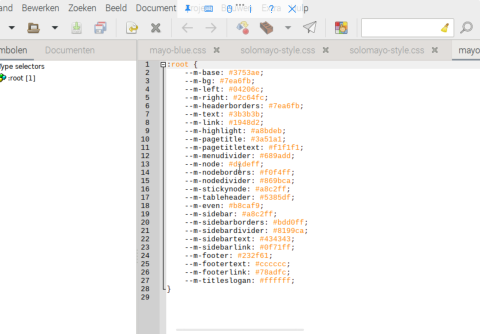
In the first line of solomayo-style.css we place an import line.
@import "colors/mayo-default.css";
This MUST be on the 1st line.
Default can be customized to the color you need. In my case this was blue for 1 site and paleblue for 2 other sites. I now have my own site with "default ".
Because Solo does not have Georgia as a font, we have to place it in our CSS.
body {
font-family: Georgia, 'Palatino Linotype', 'Book Antiqua',
'URW Palladio L', Baskerville, serif;
line-height: 1.5em;
font-size: 87%;
background-color: var(—m-base);
}
h1, h2, h3 {
font-family: Georgia, 'Palatino Linotype', 'Book Antiqua', 'URW Palladio L', Baskerville, serif;
}
Solo does not have the color gradient in the header, so we also apply this in the CSS.
.header {
background: linear-gradient(to right, var(—m-left), var(—m-right)) !important;
--r-tx: var(—m-titleslogan); }
To make the edge of the body visible we need to reduce the size of the page wrapper slightly. We also apply the color and color any tables here.
#page-wrapper {
margin: 2%;
width: 96%;
border-style: solid;
border-width: 0.7em;
--r-br: var(--m-bg);
--r-bg: var(--m-bg);
--r-tx: var(--m-text);
--r-lk: var(--m-link);
--r-lk-h: var(--m-highlight);
--solo-thead: var(--m-tableheader);
--solo-even: var(--m-even);
--solo-odd: lighten(var(--m-even), 40%);
}
Because mayo does not have odd as a variable, I use the lighten option.
We need to move the main container back a little so that it is right under the header and primary menu.
.main-container-inner {
padding: 16px 0 !important;
}
.solo-outer .region-inner {
padding: 0.5rem;
}
For me the main menu is in the form of tabs with a rounded top. We do this as follows:
#primary-menu {
--r-bg: var(--m-bg);
@media (min-width: 48rem) {
.solo-inner .navigation__menubar li.nav__menu-item > a {
background-color: var(--m-node);
border-width: 1px 1px 0.4px 1px !important;
border-style: solid !important;
border-color: black !important;
border-top-left-radius: 8px;
border-top-right-radius: 8px;
margin: 5px 2px 0 2px !important;
}
}
}
The breakpoint must correspond to the breakpoint that will be set later in Solomayo.
Now it's the sidebar's turn. Here we use the class .sidebar-box-first-inner and second-inner in particular height: auto !important; is important. This ensures that the block does not become too long.
#sidebar-box-first,
#sidebar-box-second {
--r-bg: var(--m-sidebar);
--r-tx: var(--m-sidebartext);
--r-tx-lk: var(--m-sidebarlink);
}
#sidebar-box-main {
--r-bg: var(--m-node);
}
.sidebar-box-first-inner,
.sidebar-box-second-inner {
border-radius: 8px;
padding: 5px 10px;
margin-bottom: 10px;
border-style: solid;
border-width: 2px;
height: auto !important;
}
We will underline any headlines in the sidebars.
/* underline h2text in sidebars */
.sidebar-box-first h2,
.sidebar-box-second h2 {
background: transparent;
line-height: 1em;
border-bottom-style: solid;
border-bottom-width: 1px;
margin: 4px 0px 2px 0px;
padding: 2px 0px;
font-size: 1.25em;
}
/* underline node h3 */
.node__header h3 {
padding: 0px;
background: transparent;
border-bottom-style: solid;
border-bottom-width: 1px;
font-size: 1.45em;
}
The page title is placed in its own region in Solo. This is just not visible on the homepage. There you have the option to place a separate title in the welcome region.
With Mayo the page title is in the main content, at least for me.
We will also adjust these.
h1.page-title {
line-height: 1.1rem;
background-color: var(--m-pagetitle);
color: var(--m-pagetitletext);
padding: 4px 8px;
font-size: 1.3em !important;
margin-bottom: 10px;
}
Just some final adjustments.
h2 {
font-size: var(--solo-px18);
line-height: var(--solo-px20);
}
article.node {
border-radius: 8px;
padding: 5px;
margin-bottom: 10px;
border-style: solid;
border-width: 2px;
border-color: var(--m-node);
}
/*Otherwise icon is full width*/
.language-icon {
width: 16px !important;
}
The language icon took up the entire width of the screen for me and could therefore be prevented.
It can also be prevented by including image-auto in Solo's settings.
.evblok,
.lnblok {
background-color: var(--m-node);
border-radius: 8px;
padding: 5px 10px;
margin-bottom: 10px;
border-style: solid;
border-width: 1.5px;
border-color: var(--m-sidebarborders);
}
I use the 2 classes, evblok and lnblok in the views as added CSS for a clear layout.
Of course we give the copyright and footer a mayo color.
/*add colors to footer-region*/
#copyright,
#footer-container {
--r-bg: var(--m-footer);
--r-tx: var(--m-footertext);
--r-lk: var(--m-footerlink);
}
Mayo contains a button.gif. I also want to use this. For this I created a folder "images" in the solomayo folder and placed the gif from Mayo in the images folder and included the following in the css:
.page-wrapper input.button {
margin: 2px;
padding: 2px 10px;
color: #555555;
cursor: pointer;
font-size: 0.9em;
border: solid 1px #888888;
background: #fff url(../images/button.gif) repeat-x center;
}
Finally, I make sure that menu items in the footer are vertical.
/* if extra menu's are in bottom, to make it vertical*/
.navigation__menubar-gebruikersmenu,
.navigation__menubar-menu-redactie,
.navigation__menubar-menu-kooradministratie {
width: 100%;
display: block !important;
padding: 8px 16px;
text-align: left;
border: none;
line-height: var(--solo-px3);
font-size: var(--solo-px15);
white-space: normal;
float: none;
outline: 0;
}
The solomayo-style.css is now ready.
Now we have to make a few adjustments to the settings.
Manage>Appearance>Solomayo>settings
Global Site
I set Website Width -Solo Theme to 100%.
Menus Breakpoints - Solo Theme should be the same as what we put in the CSS. So for me it's 768px/48rem.
<SAVE> (you run the risk that if you make too many changes, not everything will be included)
Page Wrapper.
CSS Classes Only image-auto. This prevents an image from being image wide, if it is also a link.
Main Containers.
The 3 column setting to 20-60-20
Select from this list to enable.... 8px/0.5rem
Tick box prefer rounding.. yes
Tick box rear range mobile layout.... yes
Social Media Links
show Social icons no, unless you would like this.
Copyright & Credit
adapt to your own situation.
Logo and Favicon
adapt to your own situation.
<SAVE>
And this is the result.
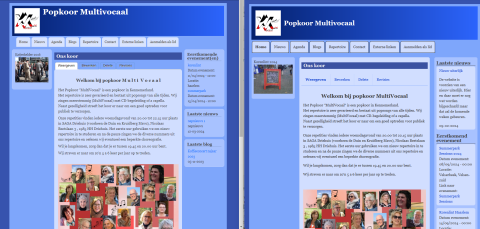
Drupal 9 theme Mayo Drupal10 theme Solo


